Download tarball that contains all Microsoft fonts
To install them type the followiing in a terminal:
cd ~
wget http://www.stchman.com/tools/MS_fonts/msfonts.tbz
sudo tar -xvjpf ~/msfonts.tbz -C /usr/share/fonts/truetype/msttcorefonts
sudo fc-cache -f -v
rm -f ~/msfonts.tbz
Source
Thursday 2 October 2014
Friday 15 August 2014
Cacti setup on Debian 7
The only no-nonsense cacti tutorial that actually worked for me on Debian 7.
SNMP (or Simple Network Management Protocol) is used to gather data on what is going on within a device, such as load, hard disk states, bandwidth. These data are used by network monitoring tools such as Cacti to generate graphs for monitoring purposes.
In a typical deployment of Cacti and SNMP, there will be one or more SNMP-enabled devices, and a separate monitoring server where Cacti collects SNMP feeds from those devices. Please keep in mind that all the devices that need to be monitored must be SNMP enabled. In this tutorial, we will be configuring Cacti and SNMP on the same Linux server for demonstration purpose.
Configure SNMP on Debian or Ubuntu
To install SNMP agent (snmpd) on a Debian-based system, run the following command.
root@server:~# apt-get install snmpd
Then edit its configuration like the following.
root@server:~# vim /etc/snmp/snmpd.conf
# this will make snmpd listen on all interfaces
agentAddress  udp:161

# a read only community 'myCommunity' and the source network is defined
rocommunity myCommunity 172.17.1.0/24

sysLocation    Earth
sysContact     email@domain.tld
After editing the config file, restart snmpd.
root@server:~# service snmpd restart
Configure SNMP on CentOS or RHEL
To install SNMP tools and libraries, run the following command.
root@server:~# sudo yum install net-snmp
Then edit an SNMP config file like the following.
root@server:~# vim /etc/snmp/snmpd.conf
# A user 'myUser' is being defined with the community string 'myCommunity' and source network 172.17.1.0/24
com2sec myUser 172.17.1.0/24 myCommunity

# myUser is added into the group 'myGroup' and the permission of the group is defined
group    myGroup    v1        myUser
group    myGroup    v2c        myUser
view all included .1
access myGroup    ""    any    noauth     exact    all    all    none
root@server:~# service snmpd restart
root@server:~# chkconfig snmpd on
root@server:~# chkconfig snmpd on
Restart snmpd service, and add it to startup service list.
Testing SNMP
SNMP can be tested by running the snmpwalk command. If SNMP has been successfully configured, this command will generate a ton of output.
root@server:~# snmpwalk -c myCommunity 172.17.1.44 -v1
iso.3.6.1.2.1.1.1.0 = STRING: "Linux mrtg 3.5.0-17-generic #28-Ubuntu SMP Tue Oct 9 19:31:23 UTC 2012 x86_64"
iso.3.6.1.2.1.1.2.0 = OID: iso.3.6.1.4.1.8072.3.2.10
iso.3.6.1.2.1.1.3.0 = Timeticks: (2097) 0:00:20.97

~~ OUTPUT TRUNCATED ~~

iso.3.6.1.2.1.92.1.1.2.0 = Gauge32: 1440
iso.3.6.1.2.1.92.1.2.1.0 = Counter32: 1
iso.3.6.1.2.1.92.1.2.2.0 = Counter32: 0
iso.3.6.1.2.1.92.1.3.1.1.2.7.100.101.102.97.117.108.116.1 = Timeticks: (1) 0:00:00.01
iso.3.6.1.2.1.92.1.3.1.1.3.7.100.101.102.97.117.108.116.1 = Hex-STRING: 07 DD 0B 12 00 39 27 00 2B 06 00
Configure Cacti with SNMP
In this tutorial, we are setting up both Cacti and SNMP on the same Linux server. So go ahead and install Cacti on your Linux server on which SNMP was just configured.
After installation, Cacti web interface can be accessed using the link "http://172.17.1.44/cacti", of course, in your case, the IP address of your server.

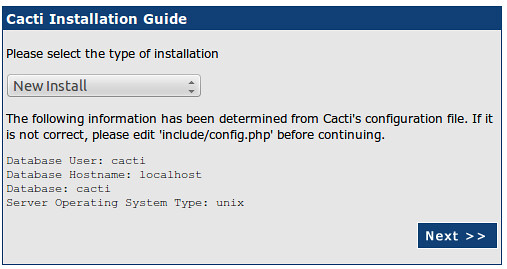
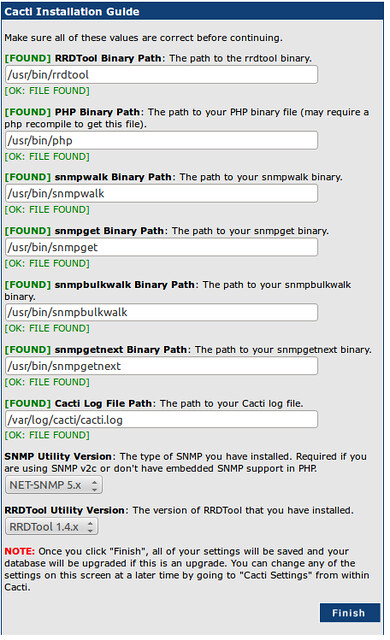
The paths during Cacti installation are usually correct. But they can be double checked if necessary.
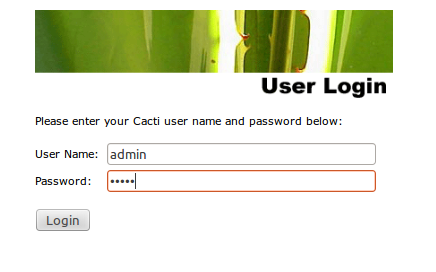
During the first-time installation, the default username and password for Cacti are "admin" and "admin". You will be forced to change the password after first login.
Add and Manage Devices to Cacti
Cacti will poll devices based on SNMP string that was configured earlier. In this tutorial, we will add only the local server where SNMP is already enabled.
To add devices, we login as admin and go to console in the Cacti admin panel. We click Console > Devices.

There may already be a device named 'localhost'. We do not need it as we will create fresh graphs. We can delete this device from the list. We add a new device by using the 'add' button.

Next, we set the device parameters.

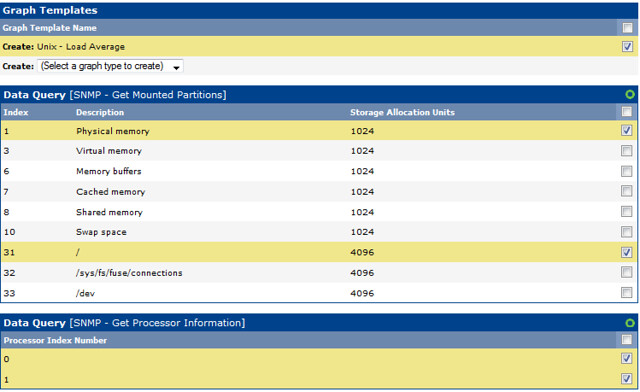
Now that the device has been added, we specify the graph templates that we want to create. This section can be found in the bottom section of the page.
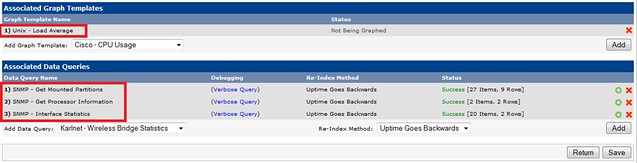
And then we proceed to creating the graphs.

Here, we create graphs for load average, RAM and hard disk, processor.
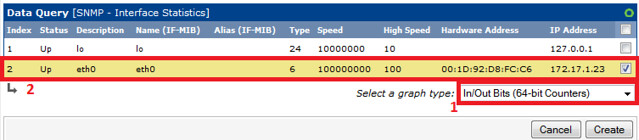
Interface Graphs and 64-bit Counters
By default, Cacti uses 32-bit counters in SNMP queries. 32-bit counters are sufficient for most bandwidth graphs, but they do not work correctly for graphs greater than 100 Mbps. If it is known that the bandwidth will exceed more than 100 Mbps, it is always advisable to use 64-bit counters. Using 64-bit counters is not hard at all.
Note: It takes around 15 minutes for Cacti to populate new graphs. There are not alternatives to being patient.
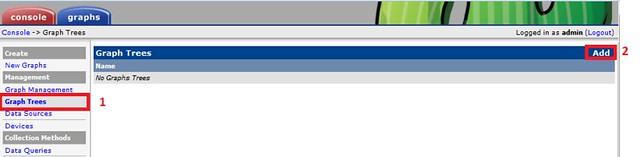
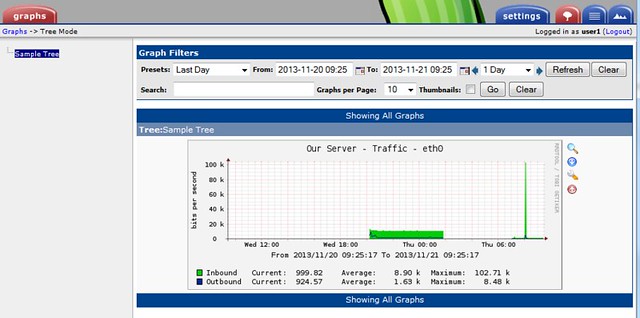
Creating Graph Trees
These snapshots illustrate how to create graph trees and how to add graph to those trees.

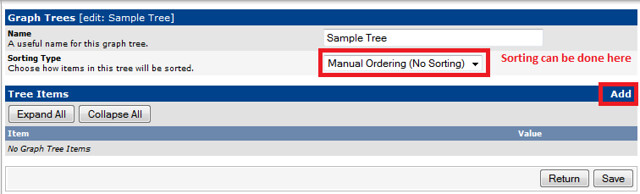
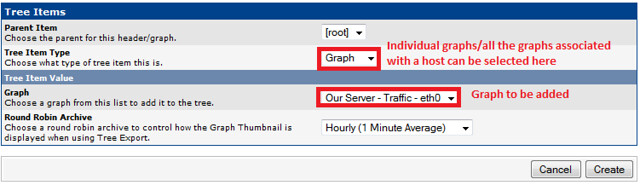
We can verify the graph in the graph tree.

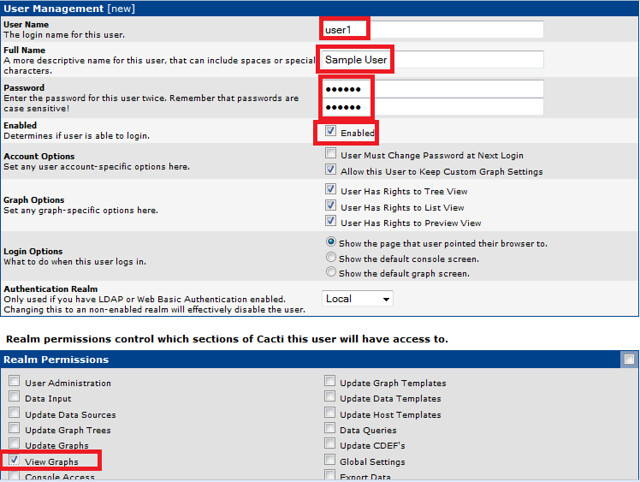
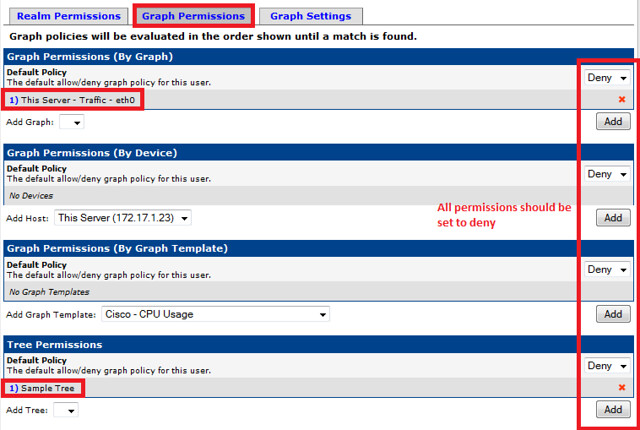
User Management
Finally, we create a user with view permission to only the graph that we have created. Cacti has built in user management system, and it is highly customizable.

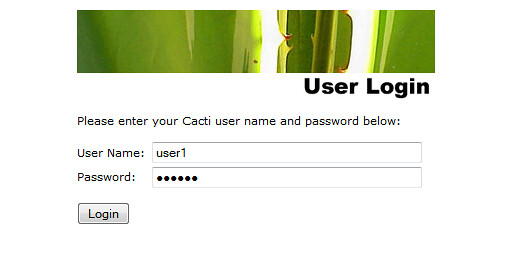
After completing these steps, we can log in with the user 'user1' and verify that only this user is able to view the graph.
And thus we have deployed a Cacti server in the network monitoring system. Cacti servers are stable, and can deal with tons of graphs without any problems.
Hope this helps.
Saturday 31 May 2014
Run Tornado ap on nginx using supervisor
First need to install supervisor:
apt-get install supervisor
Then add tornado.conf to /etc/supervisor/conf.d
an example tornado.conf:
Now fire the supervisor console:
If everyhing is alrigh you will see
tornadoes:tornado-8000 RUNNING pid 25430, uptime 0:11:42
tornadoes:tornado-8001 RUNNING pid 25431, uptime 0:11:42
Otherwise
Check the process status
tornadoes:tornado-8000 FATAL Exited too quickly (process log may have details)
tornadoes:tornado-8001 FATAL Exited too quickly (process log may have details)
tornadoes:tornado-8000 RUNNING pid 6023, uptime 0:03:32
tornadoes:tornado-8001 RUNNING pid 6024, uptime 0:03:32
apt-get install supervisor
Then add tornado.conf to /etc/supervisor/conf.d
an example tornado.conf:
programs=tornado-8000,tornado-8001add tornado config to nginx.conf
stderr_logfile=/var/log/tornado.err.log
[program:tornado-8000]
command=python /path/to/upload.py --port=8000
directory=/path/to
user=www-data
autorestart=true
redirect_stderr=true
stdout_logfile=/var/log/tornado.log
stderr_logfile=/var/log/tornado.err.log
loglevel=info
[program:tornado-8001]
command=python /path/to/upload.py --port=8001
directory=/path/to
user=www-data
autorestart=true
redirect_stderr=true
stdout_logfile=/var/log/tornado.log
stderr_logfile=/var/log/tornado.err.log
loglevel=info
proxy_next_upstream error;
upstream tornadoes {
server 127.0.0.1:8000;
server 127.0.0.1:8001;
}
server {
listen 1.2.3.4:80;
server_name example.com;
root /path/to;
client_max_body_size 50m;
try_files $uri @tornado;
error_log /var/log/nginx/tornado-error.log;
access_log /var/log/nginx/tornado-access.log;
location ^~ /static/ {
root /path/to;
if ($query_string) {#
expires max;
}
}
location ~* ^.+.(jpg|jpeg|gif|png|rar|ico|xml|avi|zip|3gp|flv|pdf)$ {
expires max;
root /path/to;
add_header Pragma public;
add_header Cache-Control "public, must-revalidate, proxy-revalidate";
}
location @tornado {
proxy_pass_header Server;
proxy_set_header Host $http_host;
proxy_redirect off;
proxy_set_header X-Real-IP $remote_addr;
proxy_set_header X-Scheme $scheme;
proxy_pass http://tornadoes;
}
}
Now fire the supervisor console:
~# supervisorctlsupervisor> update
If everyhing is alrigh you will see
tornadoes:tornado-8000 RUNNING pid 25430, uptime 0:11:42
tornadoes:tornado-8001 RUNNING pid 25431, uptime 0:11:42
Otherwise
Check the process status
supervisor> statusIf there is something wrong you will see:
tornadoes:tornado-8000 FATAL Exited too quickly (process log may have details)
tornadoes:tornado-8001 FATAL Exited too quickly (process log may have details)
If you don't see the processes running, you need to restart them
supervisor> restart all
tornadoes:tornado-8001 RUNNING pid 6024, uptime 0:03:32
That's it!
Tuesday 20 May 2014
Setting up Varnish on Drupal 7 on Debian
apt-get install varnishInstall and activate varnish module
https://drupal.org/project/varnish
nano /etc/default/varnishRepace the default config with this
# Configuration file for varnish
#
# /etc/init.d/varnish expects the variables $DAEMON_OPTS, $NFILES and $MEMLOCK
# to be set from this shell script fragment.
#
# Note: If systemd is installed, this file is obsolete and ignored. You will
# need to copy /lib/systemd/system/varnish.service to /etc/systemd/system/ and
# edit that file.
# Should we start varnishd at boot? Set to "no" to disable.
START=yes
# Maximum number of open files (for ulimit -n)
NFILES=131072
# Maximum locked memory size (for ulimit -l)
# Used for locking the shared memory log in memory. If you increase log size,
# you need to increase this number as well
MEMLOCK=82000
# Default varnish instance name is the local nodename. Can be overridden with
# the -n switch, to have more instances on a single server.
# INSTANCE=$(uname -n)
# This file contains 4 alternatives, please use only one.
## Alternative 4, Do It Yourself
#Dervice from:
#http://www.lullabot.com/blog/article/configuring-varnish-high-availability-multiple-web-servers
# DAEMON_OPTS=""
DAEMON_OPTS="-a :80,:443 \
-T localhost:6082 \
-f /etc/varnish/default.vcl \
-u varnish -g varnish \
-S /etc/varnish/secret \
-p thread_pool_add_delay=2 \
-p thread_pools=8 \
-p thread_pool_min=100 \
-p thread_pool_max=4000 \
-p session_linger=50 \
-p sess_workspace=262144 \
-s malloc,3G"
Now down to default.vcl
nano /etc/varnish/default.vcl
Dont't forget to chagne acl internal IP below:
# This is a basic VCL configuration file for varnish. See the vcl(7) main page for details on VCL syntax and semantics.
#
# Default backend definition. Set this to point to your content server.
#
backend default {
.host = "127.0.0.1";
.port = "8080";
.connect_timeout = 600s;
.first_byte_timeout = 600s;
.between_bytes_timeout = 600s;
}
acl internal {
# "192.10.0.0"/24;
#CHANGE THIS
"1.2.3.4";
}
# Respond to incoming requests.
sub vcl_recv {
if (req.request == "GET" && req.url ~ "^/varnishcheck$") {
error 200 "Varnish is Ready";
}
# Allow the backend to serve up stale content if it is responding slowly.
if (!req.backend.healthy) {
# Use anonymous, cached pages if all backends are down.
unset req.http.Cookie;
if (req.http.X-Forwarded-Proto == "https") {
set req.http.X-Forwarded-Proto = "http";
}
set req.grace = 30m;
} else {
set req.grace = 15s;
}
# Get ride of progress.js query params
if (req.url ~ "^/misc/progress\.js\?[0-9]+$") {
set req.url = "/misc/progress.js";
}
# If global redirect is on
#if (req.url ~ "node\?page=[0-9]+$") {
# set req.url = regsub(req.url, "node(\?page=[0-9]+$)", "\1");
# return (lookup);
#}
# Do not cache these paths.
if (req.url ~ "^/status\.php$" ||
req.url ~ "^/update\.php$" ||
req.url ~ "^/ooyala/ping$" ||
req.url ~ "^/admin" ||
req.url ~ "^/admin/.*$" ||
req.url ~ "^/user" ||
req.url ~ "^/user/.*$" ||
req.url ~ "^/users/.*$" ||
req.url ~ "^/info/.*$" ||
req.url ~ "^/flag/.*$" ||
req.url ~ "^.*/ajax/.*$" ||
req.url ~ "^.*/ahah/.*$") {
return (pass);
}
# Pipe these paths directly to Apache for streaming.
if (req.url ~ "^/admin/content/backup_migrate/export") {
return (pipe);
}
# Do not allow outside access to cron.php or install.php.
if (req.url ~ "^/(cron|install)\.php$" && !client.ip ~ internal) {
# Have Varnish throw the error directly.
error 404 "Page not found.";
# Use a custom error page that you've defined in Drupal at the path "404".
# set req.url = "/404";
}
# Handle compression correctly. Different browsers send different
# "Accept-Encoding" headers, even though they mostly all support the same
# compression mechanisms. By consolidating these compression headers into
# a consistent format, we can reduce the size of the cache and get more hits.=
# @see: http:// varnish.projects.linpro.no/wiki/FAQ/Compression
if (req.http.Accept-Encoding) {
if (req.http.Accept-Encoding ~ "gzip") {
# If the browser supports it, we'll use gzip.
set req.http.Accept-Encoding = "gzip";
}
else if (req.http.Accept-Encoding ~ "deflate") {
# Next, try deflate if it is supported.
set req.http.Accept-Encoding = "deflate";
}
else {
# Unknown algorithm. Remove it and send unencoded.
unset req.http.Accept-Encoding;
}
}
# Always cache the following file types for all users.
if (req.url ~ "(?i)\.(png|gif|jpeg|jpg|ico|swf|css|js)(\?[a-z0-9]+)?$") {
unset req.http.Cookie;
}
# Remove all cookies that Drupal doesn't need to know about. ANY remaining
# cookie will cause the request to pass-through to a backend. For the most part
# we always set the NO_CACHE cookie after any POST request, disabling the
# Varnish cache temporarily. The session cookie allows all authenticated users
# to pass through as long as they're logged in.
#
# 1. Append a semi-colon to the front of the cookie string.
# 2. Remove all spaces that appear after semi-colons.
# 3. Match the cookies we want to keep, adding the space we removed
# previously, back. (\1) is first matching group in the regsuball.
# 4. Remove all other cookies, identifying them by the fact that they have
# no space after the preceding semi-colon.
# 5. Remove all spaces and semi-colons from the beginning and end of the
# cookie string.
if (req.http.Cookie) {
set req.http.Cookie = ";" + req.http.Cookie;
set req.http.Cookie = regsuball(req.http.Cookie, "; +", ";");
set req.http.Cookie = regsuball(req.http.Cookie, ";(S{1,2}ESS[a-z0-9]+|NO_CACHE)=", "; \1=");
set req.http.Cookie = regsuball(req.http.Cookie, ";[^ ][^;]*", "");
set req.http.Cookie = regsuball(req.http.Cookie, "^[; ]+|[; ]+$", "");
if (req.http.Cookie == "") {
# If there are no remaining cookies, remove the cookie header. If there
# aren't any cookie headers, Varnish's default behavior will be to cache
# the page.
unset req.http.Cookie;
}
else {
# If there is any cookies left (a session or NO_CACHE cookie), do not
# cache the page. Pass it on to Apache directly.
return (pass);
}
}
## From default below ##
if (req.restarts == 0) {
if (req.http.x-forwarded-for) {
set req.http.X-Forwarded-For =
req.http.X-Forwarded-For + ", " + client.ip;
} else {
set req.http.X-Forwarded-For = client.ip;
}
}
if (req.request != "GET" &&
req.request != "HEAD" &&
req.request != "PUT" &&
req.request != "POST" &&
req.request != "TRACE" &&
req.request != "OPTIONS" &&
req.request != "DELETE") {
/* Non-RFC2616 or CONNECT which is weird. */
return (pipe);
}
if (req.request != "GET" && req.request != "HEAD") {
/* We only deal with GET and HEAD by default */
return (pass);
}
## Unset Authorization header if it has the correct details...
#if (req.http.Authorization == "Basic ") {
# unset req.http.Authorization;
#}
if (req.http.Authorization || req.http.Cookie) {
/* Not cacheable by default */
return (pass);
}
return (lookup);
}
# Code determining what to do when serving items from the Apache servers.
sub vcl_fetch {
# Don't allow static files to set cookies.
if (req.url ~ "(?i)\.(png|gif|jpeg|jpg|ico|swf|css|js)(\?[a-z0-9]+)?$") {
# beresp == Back-end response from the web server.
unset beresp.http.set-cookie;
}
else if (beresp.http.Cache-Control) {
unset beresp.http.Expires;
}
if (beresp.status == 301) {
set beresp.ttl = 1h;
return(deliver);
}
## Doesn't seem to work as expected
#if (beresp.status == 500) {
# set beresp.saintmode = 10s;
# return(restart);
#}
# Allow items to be stale if needed.
set beresp.grace = 1h;
}
# Set a header to track a cache HIT/MISS.
sub vcl_deliver {
if (obj.hits > 0) {
set resp.http.X-Varnish-Cache = "HIT";
}
else {
set resp.http.X-Varnish-Cache = "MISS";
}
}
# In the event of an error, show friendlier messages.
sub vcl_error {
set obj.http.Content-Type = "text/html; charset=utf-8";
set obj.http.Retry-After = "5";
synthetic {"
<?xml version="1.0" encoding="utf-8"?>
<!DOCTYPE html PUBLIC "-//W3C//DTD XHTML 1.0 Strict//EN"
"http://www.w3.org/TR/xhtml1/DTD/xhtml1-strict.dtd">
<html>
<head>
<title>"} + obj.status + " " + obj.response + {"</title>
</head>
<body>
<h1>Error "} + obj.status + " " + obj.response + {"</h1>
<p>"} + obj.response + {"</p>
<h3>Guru Meditation:</h3>
<p>XID: "} + req.xid + {"</p>
<hr>
<p>Varnish cache server</p>
</body>
</html>
"};
return (deliver);
}
service varnish restart
Test if it works:
http://www.isvarnishworking.com/
You can also install this Perl lib to check varnish locally:
sudo apt-get install libwww-perl && GET -Used http://localhost:6081/index.html
Sources:Handy:http://andrewdunkle.com/2012/installing-varnish-for-drupal-7.htmlMore in-depth:http://www.lullabot.com/blog/article/configuring-varnish-high-availability-multiple-web-serversSunday 27 April 2014
How to merge to videos using ffmpeg
ffmpeg -i 1.mp4 -sameq 1.mpg
ffmpeg -i 2.mp4 -sameq 2.mpg
cat 1.mpg 2.mpg | ffmpeg -f mpeg -i - -sameq -vcodec mpeg4 output.mp4sourceSaturday 26 April 2014
Delete dupicate entries in mysql table
CREATE TABLE wpdb.wp_posts_deduped like wpdb.wp_posts;
INSERT wpdb.wp_posts_deduped SELECT * FROM wpdb.wp_posts GROUP BY post_content, post_title;
RENAME TABLE wpdb.wp_posts TO wpdb.wp_posts_with_dupes;
RENAME TABLE wpdb.wp_posts_deduped TO wpdb.wp_posts;
#OPTIONAL
ALTER TABLE wpdb.wp_posts ADD UNIQUE `unique_index` (`post_content`, `post_title`);
#OPTIONAL
DROP TABLE wpdb.wp_posts_with_dupes;
Find mysql database and tabe size
These queries are very useful to find bloated databases/tables:
Show size of all databases (in MB)
SELECT s.schema_name,
SUM(t.data_length + t.index_length)/1024/1024 total_size,
(SUM(t.data_length + t.index_length)-SUM(t.data_free))/1024/1024 data_used, SUM(data_free)/1024/1024 data_free
FROM INFORMATION_SCHEMA.SCHEMATA s INNER JOIN INFORMATION_SCHEMA.TABLES t
ON s.schema_name = t.table_schema
GROUP BY s.schema_name
ORDER BY total_size DESC;
Show size of all tables (in MB)
SELECT s.schema_name, table_name,
SUM(t.data_length + t.index_length)/1024/1024 total_size,
(SUM(t.data_length + t.index_length)-SUM(t.data_free))/1024/1024 data_used,
SUM(data_free)/1024/1024 data_free
FROM INFORMATION_SCHEMA.SCHEMATA s INNER JOIN INFORMATION_SCHEMA.TABLES t
ON s.schema_name = t.table_schema
GROUP BY s.schema_name, table_name
ORDER BY total_size DESC;
Source
Sunday 16 February 2014
Burn srt to avi in Linux
To split files use avisplit like:avisplit -s 300 -i video.avi Then to burn subtitle to the video.avi:
mencoder in.mp4 -sub mysub.srt -subcp utf8 -subfont-text-scale 2 -sub-bg-color 0 -sub-bg-alpha 100 -subfont-outline 1 -ovc xvid -oac mp3lame -xvidencopts pass=1 -o out.mp4
Note: You need to either import a proper ttf file to your ~/.mplayer OR symlink the folder to a ttf file in /usr/share/fonts. (Doc)
Thursday 6 February 2014
Install tahoma fonts on Ubuntu
wget -c http://hezardastan.sourceforge.net/persianfonts/tahoma.tar.gz
wget -c http://hezardastan.sourceforge.net/persianfonts/bfonts.tar.gz
sudo mkdir /usr/share/fonts/truetype/ttf-persian-fonts
sudo tar zxvf tahoma.tar.gz -C /usr/share/fonts/truetype/ttf-persian-fonts
sudo tar zxvf bfonts.tar.gz -C /usr/share/fonts/truetype/ttf-persian-fonts
sudo fc-cache -f -vTuesday 4 February 2014
How to counter botnets?
First, what are the indications that you are under attack by botnets?
Usually a very high load on web server without much spike in bandwidth usage or high load on database is a good indication that botnest are involved.
Also, if you use software firewalls like CSF (You should!) you will see on top command that ldf process eats up a lot of your cpu time. This means a lot of requests are coming through and the firewall needs to deal with them, hence its high cpu usage.
To make sure check your web server access log. Botnets can be recognized by the fact that they send the most number of request usually to get the the website's root. So you see many requests like:
GET / HTTP/1.1" 200 7288 "http://yourdomain.com/" "Mozilla/5.0 (Windows; U; Windows NT 6.0; en-US; rv:1.2.3.4) Gecko/20090922 Firefox/3.5.2 (.NET CLR 3.4.5678)"
in your access.log
How to counter botnest?
Don't worry! Botnets are very stupid as they all use the same user agent (at least the one that I've encountered). So it is easy to tame them if the botnet is not very large.
Once you could pinpoint the botnet 'user agent', it is dead simple to counter them: Just add a rule to nginx to deny any request from that particular user agent:
if ($http_user_agent = "200 7288 "http://yourdomain.com/" "Mozilla/5.0 (Windows; U; Windows NT 6.0; en-US; rv:1.2.3.4) Gecko/20090922 Firefox/3.5.2 (.NET CLR 3.4.5678)") {
return 444;
}
That's it. Now the 444 means that nginx returns no information to the client and closes the connection so the botnet effort to bombard your webserver are simply ignored.
However sometimes botnets are so vast that even the above trick does not suffice, as the botnet consumes all the worker connections of nginx. In this case you need to pinpoint the attacking IPs and block them before they reach nginx.
These are scripts that I've written for this purpose:
findbadips.py
#!/usr/bin/env python
import os
from os import system
distilips.py
After adding to bad ips into csf.deny, and reloading the deny list 'deny -r' you should see that the server load quickly drops to normal.
In case you use cloudflare (you should!) you want to block all the bad IPs at cloulflare level instead of csf.
Thanks to the Cloudflare API, you can do this at one shot:
You may not see but you can be sure that your adversaries are now pitiful of the money that they spared on petite botnet Sheppard.
Usually a very high load on web server without much spike in bandwidth usage or high load on database is a good indication that botnest are involved.
Also, if you use software firewalls like CSF (You should!) you will see on top command that ldf process eats up a lot of your cpu time. This means a lot of requests are coming through and the firewall needs to deal with them, hence its high cpu usage.
To make sure check your web server access log. Botnets can be recognized by the fact that they send the most number of request usually to get the the website's root. So you see many requests like:
GET / HTTP/1.1" 200 7288 "http://yourdomain.com/" "Mozilla/5.0 (Windows; U; Windows NT 6.0; en-US; rv:1.2.3.4) Gecko/20090922 Firefox/3.5.2 (.NET CLR 3.4.5678)"
in your access.log
How to counter botnest?
Don't worry! Botnets are very stupid as they all use the same user agent (at least the one that I've encountered). So it is easy to tame them if the botnet is not very large.
Once you could pinpoint the botnet 'user agent', it is dead simple to counter them: Just add a rule to nginx to deny any request from that particular user agent:
if ($http_user_agent = "200 7288 "http://yourdomain.com/" "Mozilla/5.0 (Windows; U; Windows NT 6.0; en-US; rv:1.2.3.4) Gecko/20090922 Firefox/3.5.2 (.NET CLR 3.4.5678)") {
return 444;
}
And of course start nginx.
However sometimes botnets are so vast that even the above trick does not suffice, as the botnet consumes all the worker connections of nginx. In this case you need to pinpoint the attacking IPs and block them before they reach nginx.
These are scripts that I've written for this purpose:
findbadips.py
#!/usr/bin/env python
import os
from os import system
os.system("netstat -ntu | awk '{print $5}' | cut -d: -f1 | sort | uniq -c | sort -n > data.txt")
#trusted IPs
goodips=['1.2.3.4, '127.0.0.1']
#IPs already blocked in csf.deny
csfdenyips=['1.3.4.2', '5.4.3.2]
#http 444 that should flag bad IPs
flagstrings=['444']
with open('access.log', "r") as f,open('badips.txt', "w") as f2:
for l in f:
if (not any(ip in l for ip in goodips) and not any(ip in l for ip in csfdenyips) and any(ip in l for ip in flagstrings)):
f2.write(l.strip()+'\n')
Then you need to distill the badips.txt to remove repetitions.
distilips.py
#!/usr/bin/env python
import os
from os import system
import re
import time
#Use awk to distil access log to $IP $TIME and $URL columns
bashcom = "awk '{print $1}' <badips.txt > iprequests.txt"
os.system(bashcom)
#just in case any good ip has sneaked into the list
goodips=['1.2.3.4','127.0.0.1']
distips = []
with open('iprequests.txt', "r") as src,open('distiled-badips.txt', "w") as dest:
for l in src:
if (not any(ip in l for ip in goodips)):
if l not in distips:
distips.append(str(l))
for ip in distips:
dest.write(ip)
After adding to bad ips into csf.deny, and reloading the deny list 'deny -r' you should see that the server load quickly drops to normal.
In case you use cloudflare (you should!) you want to block all the bad IPs at cloulflare level instead of csf.
Thanks to the Cloudflare API, you can do this at one shot:
#!/bin/bash
badIPArray=( 1.2.3.4 4.2.4.2 )
for i in "${badIPArray[@]}"
do
curl -s https://www.cloudflare.com/api_json.html -d 'a=ban' -d 'tkn=YourAPIKey' -d 'email=you@example.com' -d 'key=$i';
echo "posted - $i";
done
You may not see but you can be sure that your adversaries are now pitiful of the money that they spared on petite botnet Sheppard.
Friday 24 January 2014
mezzanine notes
Error loading MySQLdb module: No module named MySQLdb
On Ubuntu 12.04, to be able to use mysql as backend database in mezzanine, do these Before creating virtualenv do install:
apt-get install libmysqlclient-dev
apt-get install python-dev
pip install mysql-python
Then on vritualenv :
pip install MySQL-python
-----------------------------
decoder jpeg not available
On Ubuntu 12.04 64 bit:
sudo ln -s /usr/lib/x86_64-linux-gnu/libjpeg.so /usr/lib
sudo ln -s /usr/lib/x86_64-linux-gnu/libfreetype.so /usr/lib
sudo ln -s /usr/lib/x86_64-linux-gnu/libz.so /usr/lib
pip install Wednesday 22 January 2014
Fix drupal 6 file permissioins
If you need to fix permissions repeatedly then the following script will help you, it is based on the guidelines given above and performs some checks before any modification to ensure it is not applied on files/directories outside your drupal installation.
#!/bin/bash
if [ $(id -u) != 0 ]; then
        printf "This script must be run as root.\n"
        exit 1
fi
drupal_path=${1%/}
drupal_user=${2}
httpd_group="${3:-www-data}"
# Help menu
print_help() {
cat <<-HELP
This script is used to fix permissions of a Drupal installation
you need to provide the following arguments:
1) Path to your Drupal installation.
2) Username of the user that you want to give files/directories ownership.
3) HTTPD group name (defaults to www-data for Apache).
Usage: (sudo) bash ${0##*/} --drupal_path=PATH --drupal_user=USER --httpd_group=GROUP
Example: (sudo) bash ${0##*/} --drupal_path=/usr/local/apache2/htdocs --drupal_user=john --httpd_group=www-data
HELP
exit 0
}
# Parse Command Line Arguments
while [ $# -gt 0 ]; do
        case "$1" in
                --drupal_path=*)
   drupal_path="${1#*=}"
   ;;
  --drupal_user=*)
   drupal_user="${1#*=}"
   ;;
  --httpd_group=*)
   httpd_group="${1#*=}"
   ;;
  --help) print_help;;
  *)
   printf "Invalid argument, run --help for valid arguments.\n";
   exit 1
 esac
 shift
done
if [ -z "${drupal_path}" ] || [ ! -d "${drupal_path}/sites" ] || [ ! -f "${drupal_path}/core/modules/system/system.module" ] && [ ! -f "${drupal_path}/modules/system/system.module" ]; then
 printf "Please provide a valid Drupal path.\n"
 print_help
 exit 1
fi
if [ -z "${drupal_user}" ] || [ $(id -un ${drupal_user} 2> /dev/null) != "${drupal_user}" ]; then
 printf "Please provide a valid user.\n"
 print_help
 exit 1
fi
cd $drupal_path
printf "Changing ownership of all contents of "${drupal_path}":\n user => "${drupal_user}" \t group => "${httpd_group}"\n"
chown -R ${drupal_user}:${httpd_group} .
printf "Changing permissions of all directories inside "${drupal_path}" to "rwxr-x---"...\n"
find . -type d -exec chmod u=rwx,g=rx,o= '{}' \;
printf "Changing permissions of all files inside "${drupal_path}" to "rw-r-----"...\n"
find . -type f -exec chmod u=rw,g=r,o= '{}' \;
printf "Changing permissions of "files" directories in "${drupal_path}/sites" to "rwxrwx---"...\n"
cd sites
find . -type d -name files -exec chmod ug=rwx,o= '{}' \;
printf "Changing permissions of all files inside all "files" directories in "${drupal_path}/sites" to "rw-rw----"...\n"
printf "Changing permissions of all directories inside all "files" directories in "${drupal_path}/sites" to "rwxrwx---"...\n"
for x in ./*/files; do
 find ${x} -type d -exec chmod ug=rwx,o= '{}' \;
 find ${x} -type f -exec chmod ug=rw,o= '{}' \;
done
echo "Done settings proper permissions on files and directories"
Copy the code above to a file, name it "fix-permissions.sh" and run it as follows:
sudo bash fix-permissions.sh --drupal_path=your/drupal/path --drupal_user=your_user_name
Note: The server group name is assumed "www-data", if it differs use the --httpd_group=GROUP argument.
Tuesday 21 January 2014
Sample text searches for suspicious PHP code
1
| grep -Rn "mkdir *(" public_html/ |
Or
1
| grep -RPn "(passthru|shell_exec|system|phpinfo|base64_decode|chmod|mkdir|fopen|fclose|readfile) *\(" public_html/ |
Subscribe to:
Posts (Atom)