Showing posts with label linux. Show all posts

Saturday, 5 June 2021

How to create lxc container on Ubuntu 18.04

If you are playing around with Linux, t is the best practice to do it on a virtual machine rather than your main Linux server. 

One popular option for sandboxing and an less known alternative to virtualbox is lxc, which is a purely text based container, native to Linux. 

Intstall it on Ubuntu 18.04 like this:

    sudo apt update

    sudo apt install openssh-server

Then you can:

    apt-get install lxc

In newer versions of lxc you also need to get containders sepeately

    apt install lxc-templates


Now you can create a container:

    lxc-create -t ubuntu -n newcon

Start the container

lxc-start -d -n newcon

Notice that by default username and password of the container sudoer are both: ubuntu

Find the container IP address:

ssh ubuntu@`sudo lxc-info -iH -n newcon`

10.0.3.147

Now you can connect to the container:

ssh ubuntu@10.0.3.147


Enjoy playing in the safe playground. 


Wednesday, 17 February 2021

How to Set ulimit Value Permanently

 In Linux, ulimit is a built-in tool to manage resource allocation at global, group, and user levels. For a multi-user system like Linux, such a feature is almost paramount to have. It can prevent the consumption of unwanted system resources like RAM, and CPU power.

Check out how to set ulimit value permanently on Linux.

Ulimit value

Ulimit enforces the predefined limit of how much resources a user can use. The tool uses a certain configuration file as the core to assign the ulimit values. For more fine-tuned control, it’s better to edit the file.

cat /etc/security/limits.conf


There are two types of limits that can be imposed: soft and hard limits. It’s better to explain these types with a simple example.

Let’s say a system admin would like a certain user to hover around a certain value. Here, the user can exceed the value if necessary but not hard-bound by it. In this case, it’ll be a soft limit. On the other hand, if the admin wants to strictly impose the limit, then it’ll be a hard limit.

Using ulimit

Ulimit is a command-line tool. Here’s the basic structure of the ulimit command.

ulimit <options>

Display all limits

The “-a” flag will list all the options and configurations for a particular user. If no user is defined, it’ll print the limits for the current user instead.

ulimit -a

ulimit -a <username>


To display the soft limits of a user, use the “-S” flag.

ulimit -Sa <username>


To display the hard limits of a user, use the “-H” flag.

ulimit -Ha <username>


It’s possible to see the limits of a certain process. The details are located in the following file. Note that it’s a unique file for each of the processes that are currently running. Swap the PID field with the PID of the target process.

cat /proc/<PID>/limits

Limit parameters

To change the ulimit, you have to declare which type of limit you’d like to define. Here’s a shortlist with all the available parameters you can change. Almost all of them define the maximum value of each of the parameters.

  • b: Socket buffer size
  • c: Size of core files created
  • d: Process’s data segment size
  • e: Scheduling priority (“nice” value)
  • f: Number of files created by the shell
  • i: Number of pending signals
  • l: Size to lock into memory
  • m: Resident set size
  • n: Number of open file descriptors
  • p: Pipe buffer size
  • q: Number of bytes in POSIX message queues
  • r: Real-time scheduling priority
  • s: Stack size
  • t: CPU time (in seconds)
  • T: Number of threads
  • u: Number of processes available to a user
  • v: Amount of virtual memory available to process
  • x: Number of file locks

Change ulimit value temporarily

It’s possible to temporarily change the value of ulimit for a particular user. The change will remain effective until the user is logged out, the session expires or the system reboots. Here, I’ll be showing an example of how to set the max process number for a user.

To change the number of available processes to 12345, run the following command. It’ll impose a temporary hard limit on the user.

ulimit -u

ulimit -u 12345


Check out the hard limit to verify.

ulimit -Hu

Change ulimit value permanently

As mentioned earlier, ulimit utilizes a system configuration file that determines the default ulimit value. By making changes to this file, you can permanently change the ulimit value for any user.

Open the file in your favorite text editor. Note that the file has to be opened with root permission for the changes to be saved.

sudo vim /etc/security/limits.conf


Here, the entries of the file follow the following structure.

<domain> <type> <item> <value>

Let’s have a quick breakdown of each of the fields.

  • domain: Usernames, groups, GUID ranges, etc.
  • type: Type of limit (soft/hard)
  • item: The resource that’s going to be limited, for example, core size, nproc, file size, etc.
  • value: The limit value

Here’s a shortlist of all the available items.

  • core: Limits core file size (in KB)
  • cpu: CPU time (in min)
  • data: Data size (in KB)
  • fsize: File size (in KB)
  • locks: File locks user can hold
  • memlock: Locked-in-memory address space (in KB)
  • nproc: Number of processors
  • rtpio: Real-time priority
  • sigpending: Number of signals pending

For a full list of available items, check out the man page of limits.conf.

man limits.conf


For example, the following entry would limit the number of CPU cores the user “Viktor” can use down to 2.

viktor hard nproc 2

Once edited, save the file. To take the changes into effect, the affected user(s) need to log out and re-login. Depending on how it’s implemented, it may also require the system to reboot.

Final thoughts

The ulimit tool offers a powerful way of managing resources. It’s simple yet powerful in what it does. Whatever you do, make sure that the limit you’re about to implement is entered correctly. If you’re trying these things out for the first time, then try to test them out in a virtual machine first.


Source

Wednesday, 27 May 2020

How to format disk larger than 2TB in Linux

Traditionally I used to use fdisk to do so (here), but it is limited to 2TB disks.

These tips are from techmint with some modification.
apt-get install parted 

1. Check Parted Version

Run the following command, you see message similar to the one shown on the image below. Don’t worry if your parted version is different. Unless specified otherwise, parted will use your primary drive, which in most cases will be /dev/sda.
$ parted
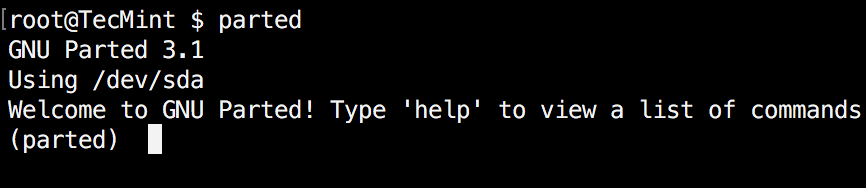
Check Parted Command Version
If you want to exit parted, simply type:
$ quit

2. List Linux Disk Partitions

Now that parted is started, let’s list the partitions of the selected hard disk. As mentioned earlier, parted chooses your first drive by default. To see the disk partitions run print.
(parted) print
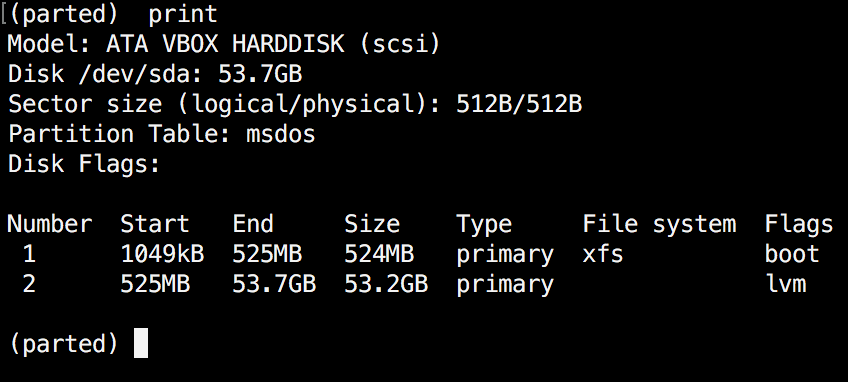
Check Linux Partitions
When running print, it will also display the hard disk information and model. Here is example from a real hard disk (not virtual as shown on the image above) :
(parted) print

Model: ATA TOSHIBA MQ01ACF0 (scsi)
Disk /dev/sda: 320GB
Sector size (logical/physical): 512B/4096B
Partition Table: msdos

Number  Start   End    Size   Type      File system  Flags

 1      1049kB  256MB  255MB  primary   ext2         boot
 2      257MB   320GB  320GB  extended
 5      257MB   320GB  320GB  logical                lvm
In the example above, you can see the disk model, capacity sector size and partition table.

3. List or Switch to Different Disk

If you have more than one hard disk, you can easily switch between disks, by using the “select” command. In the example below, I will switch from /dev/sda to /dev/sdb which is a secondary drive on my system.
To easily switch between disks you can use:
(parted) select /dev/sdX
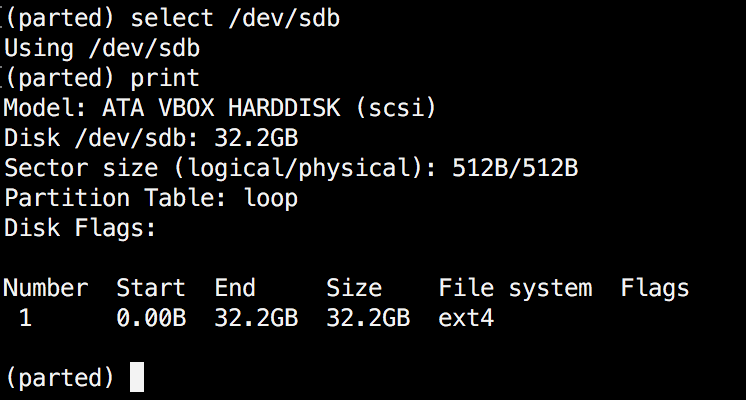
Select Different Disk
Change "X" with the letter of the disk to which you wish to switch.

4. Create Primary or Logical Partition in Linux

Parted can be used to create primary and logical disk partitions. In this example, I will show you how to create primary partition, but the steps are the same for logical partitions.
To create new partition, parted uses “mkpart“. You can give it additional parameters like "primary" or "logical" depending on the partition type that you wish to create.
Before you start creating partitions, it’s important to make sure that you are using (you have selected) the right disk.
Start by using print:
(parted) print
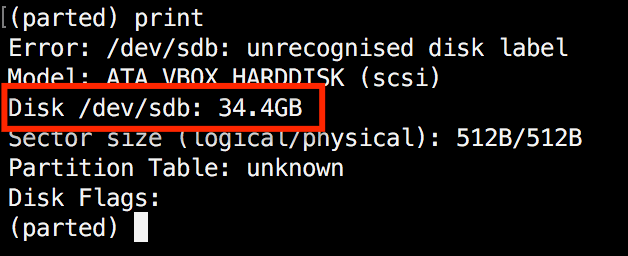
Show Current Linux Disk
As shown on the above image, we are using a virtual drive of 34 GB. First we will give the new disk a label and then create a partition and set a file system on it.
Now the first step is to give the new disk a label name with:
(parted) mklabel gpt  #Note: msdos is not suitble for > 2TBs
Now create the new partition with  mkpart. The listed units are in megabytes (MB). We will create a 10 GB partition starting from 1 to 10000:
(parted) mkpart 0% 100% primary 

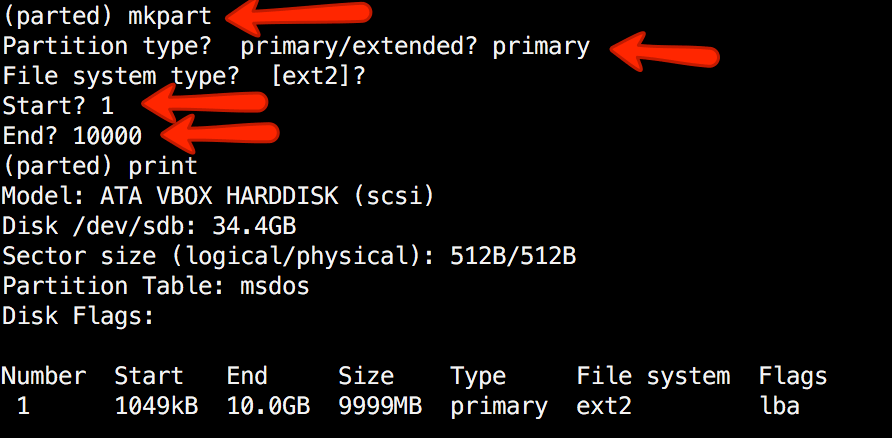
Create Primary or Logical Linux Partitions
Next,  exit parted with "quit" command. We will format our new partition in ext4 file system using mkfs. To make this happen run the following command:
# mkfs.ext4 /dev/sdb1
Note: It’s important to select the right disk and partition when executing the above command!
Now let’s verify our results, by printing the partition table on our secondary disk. Under file system column, you should see ext4 or the file system type that you have decided to use for your partition:
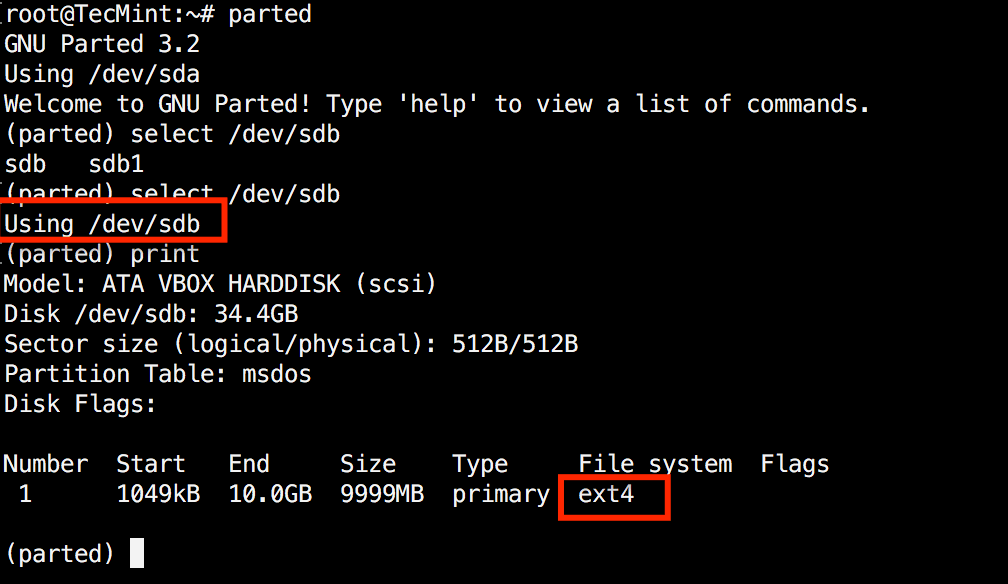
Verify Disk Partition Filesystem

5. Resize Linux Disk Partition

Parted includes multiple useful functions and one of them is "resizepart". As you have probably figured this out by now, "resizepart" helps you resize a partition.
In the example below, you will see how to resize an existing partition. For the purpose of this example, we will be using the earlier created partition.
First you will need to know the number of the partition that you will be resizing. This can be easily found by using "print":
(parted) print
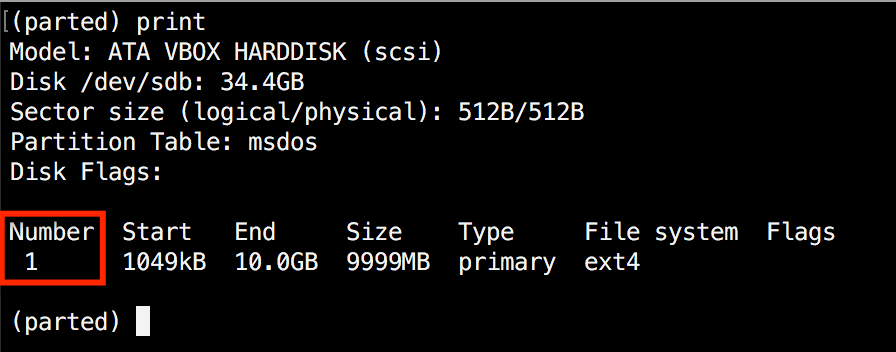
Find Linux Partition Number
In our example, the partition number is "1". Now run the resizepart command:
(parted) resizepart
You will be asked for the number of the partition that you will resize. Enter it’s number. After that, you will be asked to set the new ending point for this partition. Remember that by default the units are in MB. In our example, we have set the new partition size to 15 GB:
(parted) resizepart 
Partition number? 1
End?  [10.0GB]? 15000
Now verify the results with "print":
(parted) print
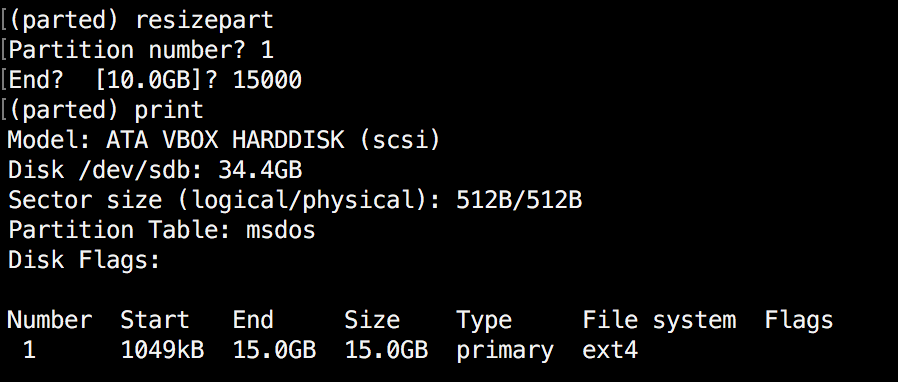
Verify Linux Resize Partition

6. Delete Linux Partition

The next thing you will learn is how to delete a partition from your hard drive. To do this, you will need to use the "rm" command within parted. To delete a disk partition you will need to know it’s number.
As mentioned earlier, you can easily obtain this number by using "print". In our example, we will delete the partition with number 1 from our secondary drive /dev/sdb1:
(parted) rm 1
Verify the results by printing the partitions table:
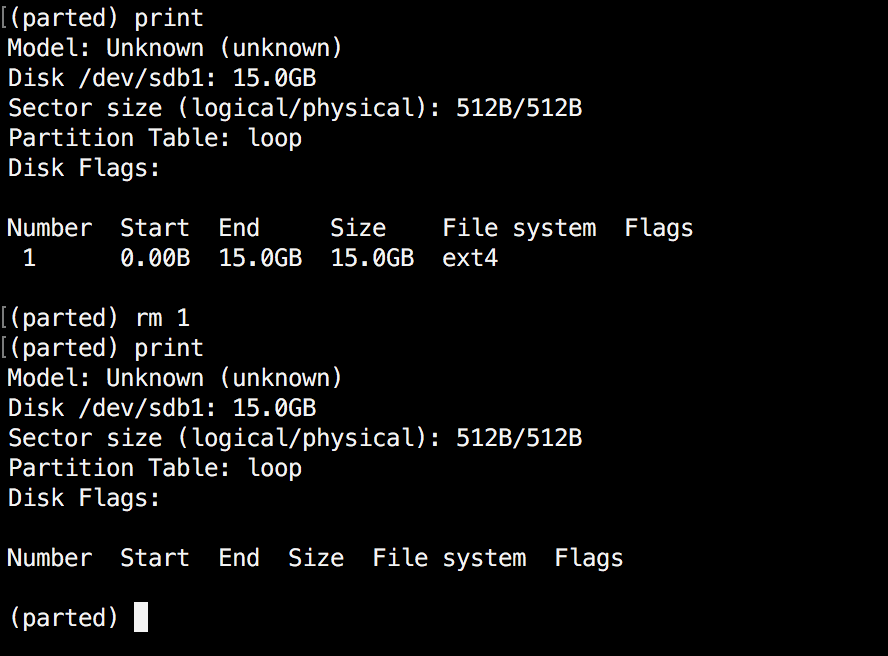
Delete a Linux Partition

7. Rescue Linux Disk Partition

Parted supports a “rescue" utility that helps you recover a lost partition between a starting and ending point. If a partition is found within that range, it will attempt to restore it.
Here is an example:
(parted) rescue
Start? 1
End? 15000
(parted) print
Model: Unknown (unknown)
Disk /dev/sdb1: 15.0GB
Sector size (logical/physical): 512B/512B
Partition Table: loop
Disk Flags:

Number Start End Size File system Flags
1 0.00B 15.0GB 15.0GB ext4

8 Change Linux Partition Flag

Using parted, you can change the state of a flag for disk partitions. The supported flags are:
  1. boot
  2. root
  3. swap
  4. hidden
  5. raid
  6. lvm
  7. lba
  8. legacy_boot
  9. irst
  10. esp
  11. palo
The states can be either "on" or "off". To change a flag simply run "set" command within parted:
(parted) set 2 lba on
The above command sets lba flag to on for second partition. Verify the results with print:
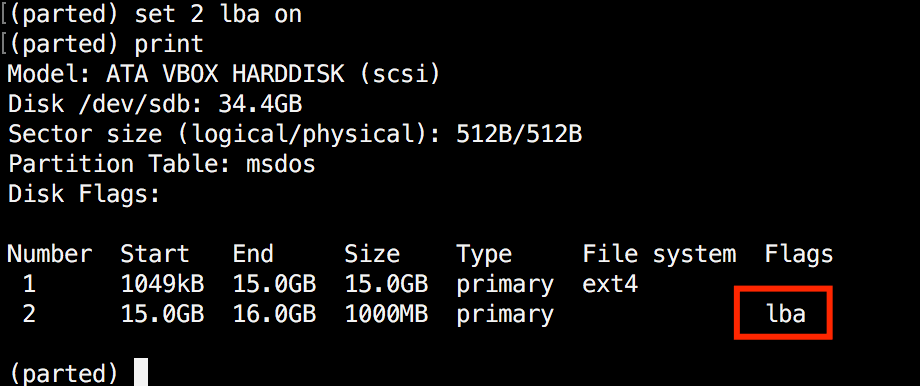
Change Partition Flag

Conclusion

Parted is a useful and powerful utility that can help you manage your disk partitions in Linux systems. As always, when working with disk partitions you need to be extra careful. It is strongly recommend to go through parted man pages to learn how you can customize it’s output and find more information about its capabilities.
If you have any questions or comments, please do not hesitate to use the comment section below.