Thursday, 22 January 2015

Send email from your own domain using Zoho and Gmail

Gone the days that Google allowed people to send email as contact@mydomain.com using their gmail account for free. Now you need to buy on of Google app products to do so.
But worry not and don't rush to buy a personalized email solution for your domain!  You still can do that with a little help from Zoho and in  this excellent post in which , Dimitrios Savvopoulos explains how to do that flawlessly. 

We will use a combination of Zoho Mail and Gmail.

Before proceeding with the Zoho setup, we have to own or create a Gmail account. When ready, proceed with creating a Zoho account:


Zoho setup

At the moment of this writing, Zoho offers free email for up to 10 Users, using a custom domain. Visit the zoho registration page and go for the free option:

Then enter your domain name and your personal details:
The zoho account is almost now complete:
Now click "Proceed to verify domain ownership". To verify your domain I suggest adding a TXT record in your DNS settings. Select TXT Method:
Follow the given instructions to add the TXT record to your dns settings. When ready, click the verify button.
Awesome! Now add a user for your email and skip the groups setting. Then, go to the MX Records page. Click "Proceed to Point MX".
You will now have to enter the following mx records to your dns. Also remove all other existing mx records.
We skip the steps about email migration and mobile access. Click "Proceed to Access ZohoMail".
Now, go to your mail inbox and go to the settings. Then select Email forwarding and POP/IMAP and apply the following settings:
As you can see, we are forwarding all our emails to our gmail account. We also delete the copies from the zoho inbox to prevent exceeding the space limit. Since gmail has a bigger size limit, this would be the first one to reach the limit, but we don't want that.
Then we disable the POP Access and enable the IMAP Access.


Gmail settings

We want to use gmail only as a storage medium, therefore we have to configure it to send mail as our domain email.
Open gmail and go to the settings, and then to accounts and import. Select "Add another email address you own" and enter your name and your domain email.
Next, we enter the smtp settings of our zoho account:
And finally, confirm your email address.
If you enabled forwarding from zoho mail already, the confirmation email should be received in your gmail inbox.
Tuesday, 20 January 2015

Simple bash command to convert all tables in a mysql database to utf8

  for t in $(mysql --user=root --password=admin  --database=DBNAME -e "show tables";);
    do 
       echo "Altering" $t;
       mysql --user=root --password=admin --database=DBNAME -e "ALTER TABLE $t CONVERT TO CHARACTER SET utf8 COLLATE utf8_unicode_ci;";
    done
Source

Friday, 16 January 2015

Install celery with rabbitmq on Django

UPDATE 1 AUGUST 2019 


After a lot of headaches at lost I found a great video  tutorial by Mike Hibbert on how to install rabbitmq with celery and setup Django to use it . It worked like a charm on Django 1.7 1.8 running on Ubuntu . The server OS is Debian 9.

First install celery on machine (no on virtualhost):

root@vps:~# apt-get  install rabbitmq-server


Then define rabitmq user, password and vhost and set permissions:

root@vps:~# rabbitmqctl add_user djuser djpass

root@vps:~# rabbitmqctl add_vhost /djangovhost

root@vps:~# rabbitmqctl set_permissions -p /djangovhost djuser ".*" ".*" ".*"


Restart the rabbitmq server:

root@vps:~# /etc/init.d/rabbitmq-server stop
[ ok ] Stopping message broker: rabbitmq-server.
root@vps:~# /etc/init.d/rabbitmq-server start
[ ok ] Starting message broker: rabbitmq-server.
root@vps:~# 
Install celery on django virtualenv:

(.djenv)root@vps:/root$ pip install celery  

also add these lines to settings.py

#Celery configs
BROKER_HOST = "127.0.0.1"
BROKER_PORT = 5672
BROKER_VHOST = "/djangovhost"
BROKER_USER = "djuser"
BROKER_PASSWORD = "djpass"
Make a celery execution script:

nano /path/to/django/celery.sh

Add this script:

#!/bin/bash

CELERY_BIN="/home/john/.djenv/bin/celery"


# App instance to use
CELERY_APP="myapp"

# Where to chdir at start.
CELERYD_CHDIR="/path/to/django"

# Extra command-line arguments to the worker
CELERYD_OPTS="--time-limit=300 --concurrency=1"

# %n will be replaced with the first part of the nodename.
CELERYD_LOG_FILE="/var/log/celery/%n%I.log"
CELERYD_PID_FILE="/var/run/celery/%n.pid"

# Workers should run as an unprivileged user.
#   You need to create this user manually (or you can choose
#   a user/group combination that already exists (e.g., nobody).
CELERYD_USER="john"
CELERYD_GROUP="john"

# If enabled pid and log directories will be created if missing,
# and owned by the userid/group configured.
CELERY_CREATE_DIRS=1

export SECRET_KEY="somesecretstring"


----------------

Now you need to deamonize the script using systemd


nano /etc/systemd/system/celery.service

[Unit]
Description=Celery  Daemon
#After=network.target
StartLimitIntervalSec=0
[Service]
Type=simple
User= john
Group= www-data
ExecStart=/path/to/django/celery.sh
#Restart=always
#RestartSec=1
Restart=on-failure
# Configures the time to wait before service is stopped forcefully.
TimeoutStopSec=300
[Install]
WantedBy=multi-user.target


--------

systemctl enable celery

systemctl start celery


check the status

systemctl status celery

The result should be like:

● celery.service - Celery  Daemon
   Loaded: loaded (/etc/systemd/system/celery.service; enabled; vendor preset: enabled)
   Active: inactive (dead) since Thu 2019-08-01 22:30:32 CDT; 33min ago
  Process: 28796 ExecStart=/path/to/django/celery.sh (code=exited, status=0/SUCCESS)
 Main PID: 28796 (code=exited, status=0/SUCCESS)


Make sure that the daemon is started

Note: if the damon is not started, you may need to: chomod o+x celery.sh


Now check if celery is actually handling the queue;


celery -A myapp worker -l info


(.djenv)john@server$ celery -A myapp worker -l info

Voila!


Thursday, 2 October 2014

Install tahoma font on Ubuntu

Download tarball that contains all Microsoft fonts

To install them type the followiing in a terminal:

cd ~
wget http://www.stchman.com/tools/MS_fonts/msfonts.tbz
sudo tar -xvjpf ~/msfonts.tbz -C /usr/share/fonts/truetype/msttcorefonts
sudo fc-cache -f -v
rm -f ~/msfonts.tbz


Source

Friday, 15 August 2014

Cacti setup on Debian 7


The only no-nonsense cacti tutorial that actually worked for me on Debian 7. 


SNMP (or Simple Network Management Protocol) is used to gather data on what is going on within a device, such as load, hard disk states, bandwidth. These data are used by network monitoring tools such as Cacti to generate graphs for monitoring purposes.
In a typical deployment of Cacti and SNMP, there will be one or more SNMP-enabled devices, and a separate monitoring server where Cacti collects SNMP feeds from those devices. Please keep in mind that all the devices that need to be monitored must be SNMP enabled. In this tutorial, we will be configuring Cacti and SNMP on the same Linux server for demonstration purpose.

Configure SNMP on Debian or Ubuntu

To install SNMP agent (snmpd) on a Debian-based system, run the following command.
root@server:~# apt-get install snmpd
Then edit its configuration like the following.
root@server:~# vim /etc/snmp/snmpd.conf
# this will make snmpd listen on all interfaces
agentAddress  udp:161

# a read only community 'myCommunity' and the source network is defined
rocommunity myCommunity 172.17.1.0/24

sysLocation    Earth
sysContact     email@domain.tld
After editing the config file, restart snmpd.
root@server:~# service snmpd restart

Configure SNMP on CentOS or RHEL

To install SNMP tools and libraries, run the following command.
root@server:~# sudo yum install net-snmp
Then edit an SNMP config file like the following.
root@server:~# vim /etc/snmp/snmpd.conf
# A user 'myUser' is being defined with the community string 'myCommunity' and source network 172.17.1.0/24
com2sec myUser 172.17.1.0/24 myCommunity

# myUser is added into the group 'myGroup' and the permission of the group is defined
group    myGroup    v1        myUser
group    myGroup    v2c        myUser
view all included .1
access myGroup    ""    any    noauth     exact    all    all    none
root@server:~# service snmpd restart
root@server:~# chkconfig snmpd on
Restart snmpd service, and add it to startup service list.

Testing SNMP

SNMP can be tested by running the snmpwalk command. If SNMP has been successfully configured, this command will generate a ton of output.
root@server:~# snmpwalk -c myCommunity 172.17.1.44 -v1
iso.3.6.1.2.1.1.1.0 = STRING: "Linux mrtg 3.5.0-17-generic #28-Ubuntu SMP Tue Oct 9 19:31:23 UTC 2012 x86_64"
iso.3.6.1.2.1.1.2.0 = OID: iso.3.6.1.4.1.8072.3.2.10
iso.3.6.1.2.1.1.3.0 = Timeticks: (2097) 0:00:20.97

~~ OUTPUT TRUNCATED ~~

iso.3.6.1.2.1.92.1.1.2.0 = Gauge32: 1440
iso.3.6.1.2.1.92.1.2.1.0 = Counter32: 1
iso.3.6.1.2.1.92.1.2.2.0 = Counter32: 0
iso.3.6.1.2.1.92.1.3.1.1.2.7.100.101.102.97.117.108.116.1 = Timeticks: (1) 0:00:00.01
iso.3.6.1.2.1.92.1.3.1.1.3.7.100.101.102.97.117.108.116.1 = Hex-STRING: 07 DD 0B 12 00 39 27 00 2B 06 00 

Configure Cacti with SNMP

In this tutorial, we are setting up both Cacti and SNMP on the same Linux server. So go ahead and install Cacti on your Linux server on which SNMP was just configured.
After installation, Cacti web interface can be accessed using the link "http://172.17.1.44/cacti", of course, in your case, the IP address of your server.
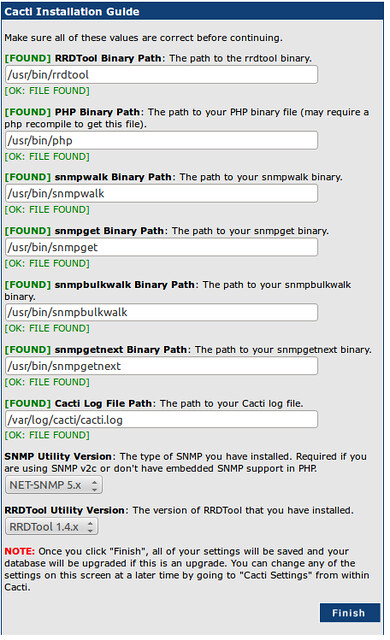
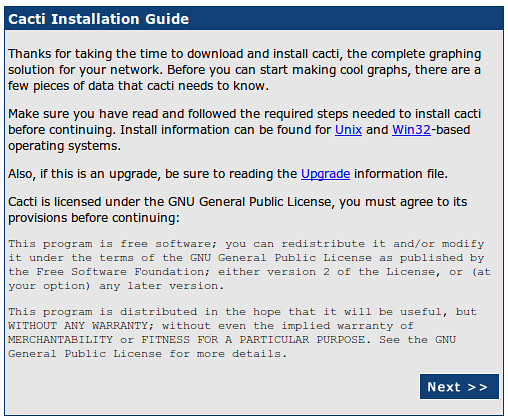
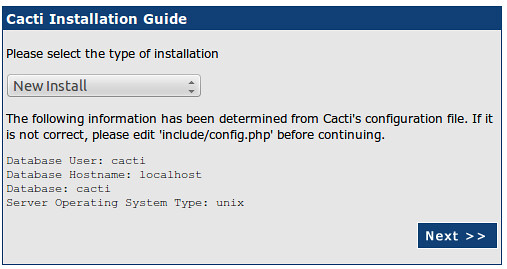
The paths during Cacti installation are usually correct. But they can be double checked if necessary.
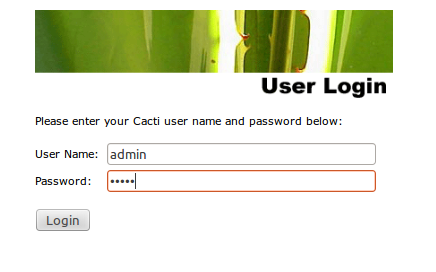
During the first-time installation, the default username and password for Cacti are "admin" and "admin". You will be forced to change the password after first login.

Add and Manage Devices to Cacti

Cacti will poll devices based on SNMP string that was configured earlier. In this tutorial, we will add only the local server where SNMP is already enabled.
To add devices, we login as admin and go to console in the Cacti admin panel. We click Console > Devices.
There may already be a device named 'localhost'. We do not need it as we will create fresh graphs. We can delete this device from the list. We add a new device by using the 'add' button.
Next, we set the device parameters.
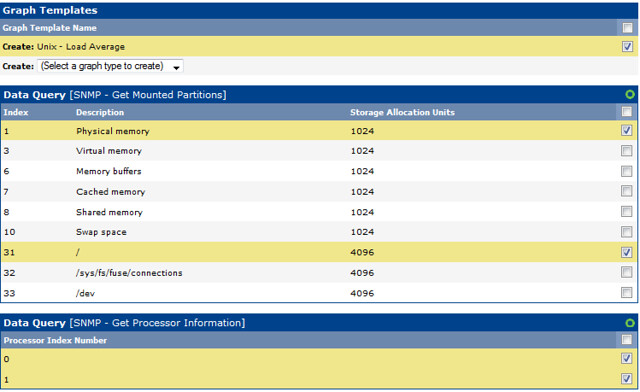
Now that the device has been added, we specify the graph templates that we want to create. This section can be found in the bottom section of the page.
And then we proceed to creating the graphs.
Here, we create graphs for load average, RAM and hard disk, processor.

Interface Graphs and 64-bit Counters

By default, Cacti uses 32-bit counters in SNMP queries. 32-bit counters are sufficient for most bandwidth graphs, but they do not work correctly for graphs greater than 100 Mbps. If it is known that the bandwidth will exceed more than 100 Mbps, it is always advisable to use 64-bit counters. Using 64-bit counters is not hard at all.
Note: It takes around 15 minutes for Cacti to populate new graphs. There are not alternatives to being patient.

Creating Graph Trees

These snapshots illustrate how to create graph trees and how to add graph to those trees.
We can verify the graph in the graph tree.

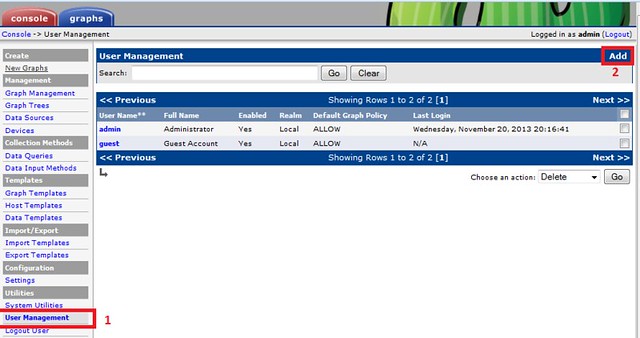
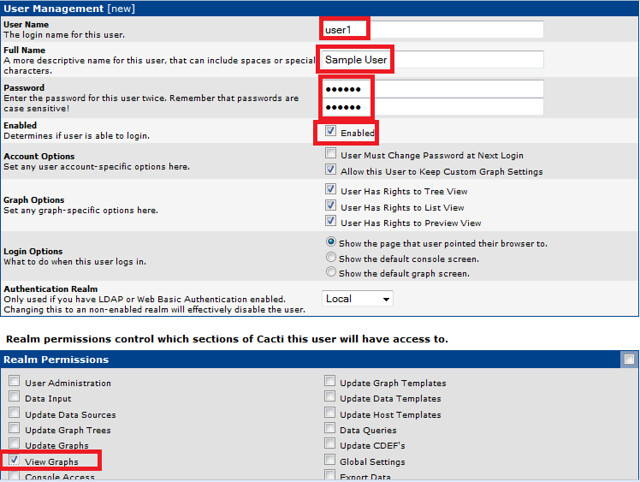
User Management

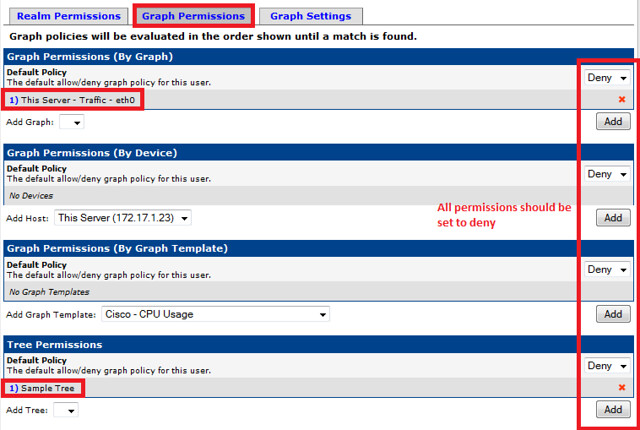
Finally, we create a user with view permission to only the graph that we have created. Cacti has built in user management system, and it is highly customizable.
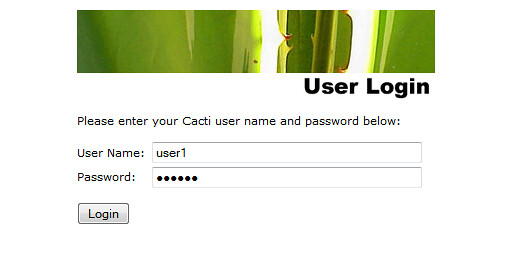
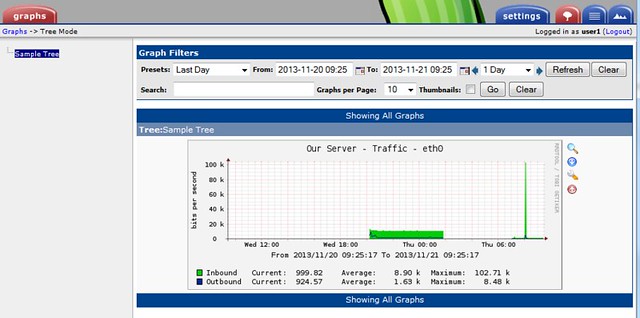
After completing these steps, we can log in with the user 'user1' and verify that only this user is able to view the graph.
And thus we have deployed a Cacti server in the network monitoring system. Cacti servers are stable, and can deal with tons of graphs without any problems.
Hope this helps.

Saturday, 31 May 2014

Run Tornado ap on nginx using supervisor

First need to install supervisor:
apt-get install supervisor

Then add tornado.conf to /etc/supervisor/conf.d

an example tornado.conf:

programs=tornado-8000,tornado-8001
stderr_logfile=/var/log/tornado.err.log

[program:tornado-8000]
command=python /path/to/upload.py --port=8000
directory=/path/to
user=www-data
autorestart=true
redirect_stderr=true
stdout_logfile=/var/log/tornado.log
stderr_logfile=/var/log/tornado.err.log
loglevel=info
[program:tornado-8001]
command=python /path/to/upload.py --port=8001
directory=/path/to
user=www-data
autorestart=true
redirect_stderr=true
stdout_logfile=/var/log/tornado.log
stderr_logfile=/var/log/tornado.err.log
loglevel=info
 
add tornado config to nginx.conf

proxy_next_upstream error;
upstream tornadoes {
server 127.0.0.1:8000;
server 127.0.0.1:8001;
}
server {
listen 1.2.3.4:80;
server_name example.com;
root /path/to;
client_max_body_size 50m;
try_files  $uri @tornado;

error_log /var/log/nginx/tornado-error.log;
access_log /var/log/nginx/tornado-access.log;

location ^~ /static/ {
        root /path/to;
        if ($query_string) {#
        expires max;
        }
}

location ~* ^.+.(jpg|jpeg|gif|png|rar|ico|xml|avi|zip|3gp|flv|pdf)$ {
        expires           max;
        root /path/to;
        add_header Pragma public;
        add_header Cache-Control "public, must-revalidate, proxy-revalidate";
 }


location @tornado  {
proxy_pass_header Server;
proxy_set_header Host $http_host;
proxy_redirect off;
proxy_set_header X-Real-IP $remote_addr;
proxy_set_header X-Scheme $scheme;
proxy_pass http://tornadoes;
}
}

Now fire the supervisor console:

~# supervisorctl
         supervisor>  update

If everyhing is alrigh you will see


tornadoes:tornado-8000           RUNNING    pid 25430, uptime 0:11:42
tornadoes:tornado-8001           RUNNING    pid 25431, uptime 0:11:42


Otherwise

Check the process status
supervisor> status
If there is something wrong you will see:

tornadoes:tornado-8000           FATAL      Exited too quickly (process log may have details)
tornadoes:tornado-8001           FATAL      Exited too quickly (process log may have details)


If you don't see the processes running, you need to restart them


supervisor> restart all

tornadoes:tornado-8000           RUNNING    pid 6023, uptime 0:03:32
tornadoes:tornado-8001           RUNNING    pid 6024, uptime 0:03:32


That's it!


Tuesday, 20 May 2014

Setting up Varnish on Drupal 7 on Debian

apt-get install varnish
Install and activate  varnish module
https://drupal.org/project/varnish

nano /etc/default/varnish
Repace the default config with this


# Configuration file for varnish
#
# /etc/init.d/varnish expects the variables $DAEMON_OPTS, $NFILES and $MEMLOCK
# to be set from this shell script fragment.
#
# Note: If systemd is installed, this file is obsolete and ignored.  You will
# need to copy /lib/systemd/system/varnish.service to /etc/systemd/system/ and
# edit that file.
# Should we start varnishd at boot?  Set to "no" to disable.
START=yes
# Maximum number of open files (for ulimit -n)
NFILES=131072
# Maximum locked memory size (for ulimit -l)
# Used for locking the shared memory log in memory.  If you increase log size,
# you need to increase this number as well
MEMLOCK=82000
# Default varnish instance name is the local nodename.  Can be overridden with
# the -n switch, to have more instances on a single server.
# INSTANCE=$(uname -n)
# This file contains 4 alternatives, please use only one.

## Alternative 4, Do It Yourself
#Dervice from:
#http://www.lullabot.com/blog/article/configuring-varnish-high-availability-multiple-web-servers
# DAEMON_OPTS=""
DAEMON_OPTS="-a :80,:443 \
             -T localhost:6082 \
             -f /etc/varnish/default.vcl \
             -u varnish -g varnish \
             -S /etc/varnish/secret \
             -p thread_pool_add_delay=2 \
             -p thread_pools=8  \
             -p thread_pool_min=100 \
             -p thread_pool_max=4000 \
             -p session_linger=50 \
             -p sess_workspace=262144 \
             -s malloc,3G"

Now down to default.vcl
nano /etc/varnish/default.vcl

Dont't forget to chagne acl internal IP below:


# This is a basic VCL configuration file for varnish. See the vcl(7) main page for details on VCL syntax and semantics.
#
# Default backend definition. Set this to point to your content server.
#
 backend default {
     .host = "127.0.0.1";
     .port = "8080";
     .connect_timeout = 600s;
     .first_byte_timeout = 600s;
     .between_bytes_timeout = 600s;
 }
acl internal {
#  "192.10.0.0"/24;
#CHANGE THIS
"1.2.3.4";
}


# Respond to incoming requests.
sub vcl_recv {
  if (req.request == "GET" && req.url ~ "^/varnishcheck$") {
    error 200 "Varnish is Ready";
  }
  # Allow the backend to serve up stale content if it is responding slowly.
  if (!req.backend.healthy) {
    # Use anonymous, cached pages if all backends are down.
    unset req.http.Cookie;
    if (req.http.X-Forwarded-Proto == "https") {
      set req.http.X-Forwarded-Proto = "http";
    }
    set req.grace = 30m;
  } else {
    set req.grace = 15s;
  }
  # Get ride of progress.js query params
  if (req.url ~ "^/misc/progress\.js\?[0-9]+$") {
    set req.url = "/misc/progress.js";
  }
  # If global redirect is on
  #if (req.url ~ "node\?page=[0-9]+$") {
  #  set req.url = regsub(req.url, "node(\?page=[0-9]+$)", "\1");
  #  return (lookup);
  #}
  # Do not cache these paths.
  if (req.url ~ "^/status\.php$" ||
      req.url ~ "^/update\.php$" ||
      req.url ~ "^/ooyala/ping$" ||
      req.url ~ "^/admin" ||
      req.url ~ "^/admin/.*$" ||
      req.url ~ "^/user" ||
      req.url ~ "^/user/.*$" ||
      req.url ~ "^/users/.*$" ||
      req.url ~ "^/info/.*$" ||
      req.url ~ "^/flag/.*$" ||
      req.url ~ "^.*/ajax/.*$" ||
      req.url ~ "^.*/ahah/.*$") {
    return (pass);
  }
  # Pipe these paths directly to Apache for streaming.
  if (req.url ~ "^/admin/content/backup_migrate/export") {
    return (pipe);
  }
  # Do not allow outside access to cron.php or install.php.
  if (req.url ~ "^/(cron|install)\.php$" && !client.ip ~ internal) {
    # Have Varnish throw the error directly.
    error 404 "Page not found.";
    # Use a custom error page that you've defined in Drupal at the path "404".
    # set req.url = "/404";
  }
  # Handle compression correctly. Different browsers send different
  # "Accept-Encoding" headers, even though they mostly all support the same
  # compression mechanisms. By consolidating these compression headers into
  # a consistent format, we can reduce the size of the cache and get more hits.=
  # @see: http:// varnish.projects.linpro.no/wiki/FAQ/Compression
  if (req.http.Accept-Encoding) {
    if (req.http.Accept-Encoding ~ "gzip") {
      # If the browser supports it, we'll use gzip.
      set req.http.Accept-Encoding = "gzip";
    }
    else if (req.http.Accept-Encoding ~ "deflate") {
      # Next, try deflate if it is supported.
      set req.http.Accept-Encoding = "deflate";
    }
    else {
      # Unknown algorithm. Remove it and send unencoded.
      unset req.http.Accept-Encoding;
    }
  }
  # Always cache the following file types for all users.
  if (req.url ~ "(?i)\.(png|gif|jpeg|jpg|ico|swf|css|js)(\?[a-z0-9]+)?$") {
    unset req.http.Cookie;
  }
  # Remove all cookies that Drupal doesn't need to know about. ANY remaining
  # cookie will cause the request to pass-through to a backend. For the most part
  # we always set the NO_CACHE cookie after any POST request, disabling the
  # Varnish cache temporarily. The session cookie allows all authenticated users
  # to pass through as long as they're logged in.
  #
  # 1. Append a semi-colon to the front of the cookie string.
  # 2. Remove all spaces that appear after semi-colons.
  # 3. Match the cookies we want to keep, adding the space we removed
  #    previously, back. (\1) is first matching group in the regsuball.
  # 4. Remove all other cookies, identifying them by the fact that they have
  #    no space after the preceding semi-colon.
  # 5. Remove all spaces and semi-colons from the beginning and end of the
  #    cookie string.
  if (req.http.Cookie) {
    set req.http.Cookie = ";" + req.http.Cookie;
    set req.http.Cookie = regsuball(req.http.Cookie, "; +", ";");
    set req.http.Cookie = regsuball(req.http.Cookie, ";(S{1,2}ESS[a-z0-9]+|NO_CACHE)=", "; \1=");
    set req.http.Cookie = regsuball(req.http.Cookie, ";[^ ][^;]*", "");
    set req.http.Cookie = regsuball(req.http.Cookie, "^[; ]+|[; ]+$", "");
    if (req.http.Cookie == "") {
      # If there are no remaining cookies, remove the cookie header. If there
      # aren't any cookie headers, Varnish's default behavior will be to cache
      # the page.
      unset req.http.Cookie;
    }
    else {
      # If there is any cookies left (a session or NO_CACHE cookie), do not
      # cache the page. Pass it on to Apache directly.
      return (pass);
    }
  }
  ## From default below ##
  if (req.restarts == 0) {
    if (req.http.x-forwarded-for) {
      set req.http.X-Forwarded-For =
      req.http.X-Forwarded-For + ", " + client.ip;
    } else {
      set req.http.X-Forwarded-For = client.ip;
    }
  }
  if (req.request != "GET" &&
    req.request != "HEAD" &&
    req.request != "PUT" &&
    req.request != "POST" &&
    req.request != "TRACE" &&
    req.request != "OPTIONS" &&
    req.request != "DELETE") {
      /* Non-RFC2616 or CONNECT which is weird. */
      return (pipe);
  }
  if (req.request != "GET" && req.request != "HEAD") {
      /* We only deal with GET and HEAD by default */
      return (pass);
  }
  ## Unset Authorization header if it has the correct details...
  #if (req.http.Authorization == "Basic ") {
  #  unset req.http.Authorization;
  #}
  if (req.http.Authorization || req.http.Cookie) {
      /* Not cacheable by default */
      return (pass);
  }
  return (lookup);
}
# Code determining what to do when serving items from the Apache servers.
sub vcl_fetch {
  # Don't allow static files to set cookies.
  if (req.url ~ "(?i)\.(png|gif|jpeg|jpg|ico|swf|css|js)(\?[a-z0-9]+)?$") {
    # beresp == Back-end response from the web server.
    unset beresp.http.set-cookie;
  }
  else if (beresp.http.Cache-Control) {
    unset beresp.http.Expires;
  }
  if (beresp.status == 301) {
    set beresp.ttl = 1h;
    return(deliver);
  }
  ## Doesn't seem to work as expected
  #if (beresp.status == 500) {
  #  set beresp.saintmode = 10s;
  #  return(restart);
  #}
  # Allow items to be stale if needed.
  set beresp.grace = 1h;
}
# Set a header to track a cache HIT/MISS.
sub vcl_deliver {
  if (obj.hits > 0) {
    set resp.http.X-Varnish-Cache = "HIT";
  }
  else {
    set resp.http.X-Varnish-Cache = "MISS";
  }
}
# In the event of an error, show friendlier messages.
sub vcl_error {
     set obj.http.Content-Type = "text/html; charset=utf-8";
     set obj.http.Retry-After = "5";
     synthetic {"
<?xml version="1.0" encoding="utf-8"?>
<!DOCTYPE html PUBLIC "-//W3C//DTD XHTML 1.0 Strict//EN"
  "http://www.w3.org/TR/xhtml1/DTD/xhtml1-strict.dtd">
<html>
   <head>
     <title>"} + obj.status + " " + obj.response + {"</title>
   </head>
   <body>
     <h1>Error "} + obj.status + " " + obj.response + {"</h1>
     <p>"} + obj.response + {"</p>
     <h3>Guru Meditation:</h3>
     <p>XID: "} + req.xid + {"</p>
     <hr>
     <p>Varnish cache server</p>
   </body>
</html>
"};
     return (deliver);
}

service varnish restart

Test if it works:
http://www.isvarnishworking.com/

You can also install this Perl lib to check varnish locally:
sudo apt-get install libwww-perl && GET -Used http://localhost:6081/index.html


Sources:
Handy:
http://andrewdunkle.com/2012/installing-varnish-for-drupal-7.html
More in-depth:
http://www.lullabot.com/blog/article/configuring-varnish-high-availability-multiple-web-servers


Sunday, 27 April 2014

How to merge to videos using ffmpeg

ffmpeg -i 1.mp4 -sameq 1.mpg
ffmpeg -i 2.mp4 -sameq 2.mpg
cat 1.mpg 2.mpg | ffmpeg -f mpeg -i - -sameq -vcodec mpeg4 output.mp4
source

Saturday, 26 April 2014

Delete dupicate entries in mysql table

CREATE TABLE wpdb.wp_posts_deduped like wpdb.wp_posts;
INSERT wpdb.wp_posts_deduped SELECT * FROM wpdb.wp_posts GROUP BY post_content, post_title;
RENAME TABLE wpdb.wp_posts TO wpdb.wp_posts_with_dupes;
RENAME TABLE wpdb.wp_posts_deduped TO wpdb.wp_posts;
#OPTIONAL
ALTER TABLE wpdb.wp_posts ADD UNIQUE `unique_index` (`post_content`, `post_title`);
#OPTIONAL
DROP TABLE wpdb.wp_posts_with_dupes;

Find mysql database and tabe size

These queries are very useful to find bloated databases/tables:

Show size of all databases (in MB)

SELECT s.schema_name, 
   SUM(t.data_length + t.index_length)/1024/1024 total_size, 
  (SUM(t.data_length + t.index_length)-SUM(t.data_free))/1024/1024 data_used, 
   SUM(data_free)/1024/1024 data_free
FROM INFORMATION_SCHEMA.SCHEMATA s INNER JOIN INFORMATION_SCHEMA.TABLES t
    ON s.schema_name = t.table_schema
GROUP BY s.schema_name
ORDER BY total_size DESC;


Show size of all tables (in MB)

SELECT s.schema_name, table_name,   
  SUM(t.data_length + t.index_length)/1024/1024 total_size,   
(SUM(t.data_length + t.index_length)-SUM(t.data_free))/1024/1024 data_used,  
  SUM(data_free)/1024/1024 data_free 
FROM INFORMATION_SCHEMA.SCHEMATA s INNER JOIN INFORMATION_SCHEMA.TABLES t 
    ON s.schema_name = t.table_schema 
GROUP BY s.schema_name, table_name 
ORDER BY total_size DESC;


Source